How to Create a Planetarium on Your Computer

This article is the last part to a three part series on how to get your kids interested in using their computer for science, technology, engineering and math (STEM) and away from using the computer just for video games. The first article focus on Searching for Extraterrestrial Intelligence (SETI) and the second article focus on becoming a field investigator. Now we will focus on learning how to read the stars through a open source planetary that you can download to your computer. This knowledge will come in handy during your field investigations.
Stellarium displays the sky as if you were looking up or through binoculars. The program allows for real time viewing and the ability to go forward or backward in time. This feature is great if you are planning a camping trip and want to study the night sky before you go. What a rock star you will be if you can point out the constellations to others.
The program offers a variety of options that you can turn on and off such as an illustrated art view of the constellations. This is especially useful when viewing with kids to help them see the boundaries or how the stars connect to each other. Another great feature, especially for kids, is the ability to change locations. As you move through space the constellations will also change and the kids can compare the difference between the sky where they live and the sky over a distance relative or friend such as grandma’s house. Along with the stars this program also gives a view of the Milky Way, planets and their moons and the nebula in Orion.
To download go to Stellarium.org and then click on the OS icon to the right of the logo that represents your computer system. For example if you are running Microsoft Windows, click on the Microsoft icon to start the download.
A couple of tips to get you started:
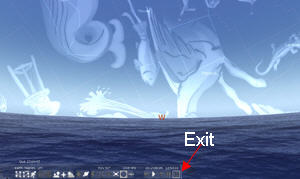
1. When I downloaded the software it took up my entire screen and I was left wondering what to do next! The image to the right is a screenshot I created with the arrow pointing to the “exit” button. You may also press "Ctrl+Q" on your keyboard.
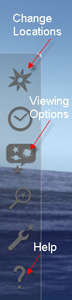
2. To change your location - see the screen shot to the right or press F6 on your keyboard. If you want to get your exact coordinates go to Google earth and type in your address, then look at the bottom of your screen for the coordinates.
3. The second arrow located right below the location arrow is where you can change your viewing options. You may also press "F4" on your keyboard to bring up the screen.
4. For additional help press "F1" on your keyboard or click on the "?" Mark located at the bottom of the left menu. This will pull up a variety of options such as keyboard shortcuts and links to help files.
To learn more or to create a curriculum goes the Open Astronomy Curricula at Digitalis Education. They provide free lessons for K-12 to promote learning in astronomy. Another site A Planetarium for Every Classroom also offers lessons. Click here to learn more about searching for ET and here to learn more about how to become an UFO investigator.